OpenHAB is an open source home automation software program which is designed to interface and manage all the various sensors and systems in an automated house. One problem however, is that many wireless sensors and actuators utilize a proprietary communications protocol that is not supported by OpenHAB.
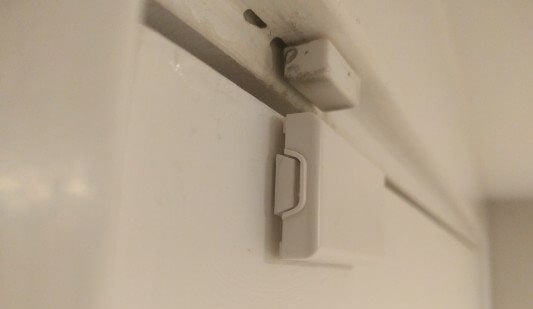
In his home, Dan Englender had several Honeywell 5800 series 345 MHz wireless security door sensors, all of which interface using a proprietary protocol that is not yet implemented in OpenHAB. In order to get around this, Dan decided to reverse engineer the protocol and implement a decoder into OpenHAB himself.
Dan’s four part write up covers the RF capture & demodulation, protocol reverse engineering and implementation into OpenHAB. First he looked up the frequency and bandwidth of the signal via the FCC filing information on fcc.io. Then he captured some packets from a door sensor using his RTL-SDR and GNU Radio, and then wrote a short Python program to decode the protocol and transmit the door open/closed information to OpenHAB. In the future he hopes to optimize the decoder so that it can comfortably run on a Raspberry Pi as the GNU Radio script uses quite a bit of computing power.
The final project is called decode345 and the code is available over on his GitHub.
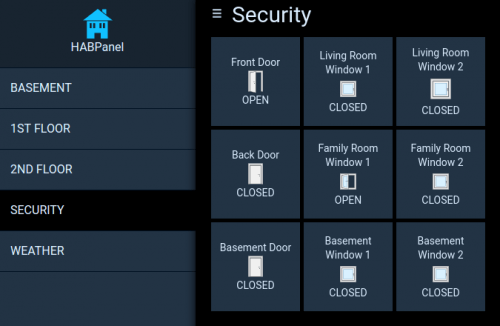
Honeywell 345 MHz Door SensorCustom Door Sensor Status in OpenHAB
[Also seen on Hackaday]
The Universal Radio Hacker is a software for investigating unknown wireless protocols. Features include
hardware interfaces for common Software Defined Radios
easy demodulation of signals
assigning participants to keep overview of your data
customizable decodings to crack even sophisticated
encodings like CC1101 data whitening
assign labels to reveal the logic of the protocol
fuzzing component to find security leaks
modulation support to inject the data back into the system
Inspectrum and Waveconverter are two similar programs for analyzing digital signals, however Universal Radio Hacker seems to be the most advanced.
Johannes has also uploaded four tutorial videos to YouTube which show the software in action. In the videos he uses Universal Radio Hacker to reverse engineer a wirelessly controlled power socket, and then in the last video he uses the software to transmit the reverse engineered signals via a HackRF.
After noting down the FCC ID printed on the device, they determined that the operating frequency was 315 MHz. They discovered from the documentation that each wireless DX device is encoded with a unique code that is precoded at the factory. Only remotes with the correct code programmed in can open the door.
The first attack they tried was a simple replay attack. They used a HackRF to record the signal, and then play it back again. This worked perfectly first time.
Next they decided to take this further and reverse engineer the protocol and see if a brute force attack could be applied. By doing some logic analysis on the circuit, they were able to figure out how to iterate over the entire key space. It turns out that the lock can be brute forced in at most 14.5 hours, or 7.25 hours on average.
Last year during a Russian wireless ‘capture the flag’ (CTF) competition one of the goals was to reverse engineer a remote controlled toy tank, and then to control it with a HackRF. One of the Russian CTF teams has posted a thorough write up on the reverse engineering process that was used on the toy tank (the link is in Russian, but Google Translate works okay).
The write up first shows the reception of the signal from the wireless controller, and then moves on to show how to receive it in GNU Radio and obtain a time domain graph of the digital signal. From the pulses it is simple to visually work out the binary string. Next an instruction decoder is created in GNU Radio which automatically obtains the binary string from the signal directly. Then once the codes for back, forward, left and right were obtained it was possible to write another GNU Radio program to transmit these codes to the RC toy tank from the HackRF.
DSpectrum is a reverse engineering tool that aims to make it trivial to demodulate digital RF transmissions. It is built on top of the Inspectrum tool which makes it easy to visualize and manually turn a captured digital RF waveform into a string of bits for later analysis by providing a draggable visual overlay that helps with determining various digital signal properties. DSpectrum added features to Inspectrum like automatically converting the waveform into a binary string with thresholding. RF .wav files for these tools can be captured by any capable radio, such as an RTL-SDR or HackRF.
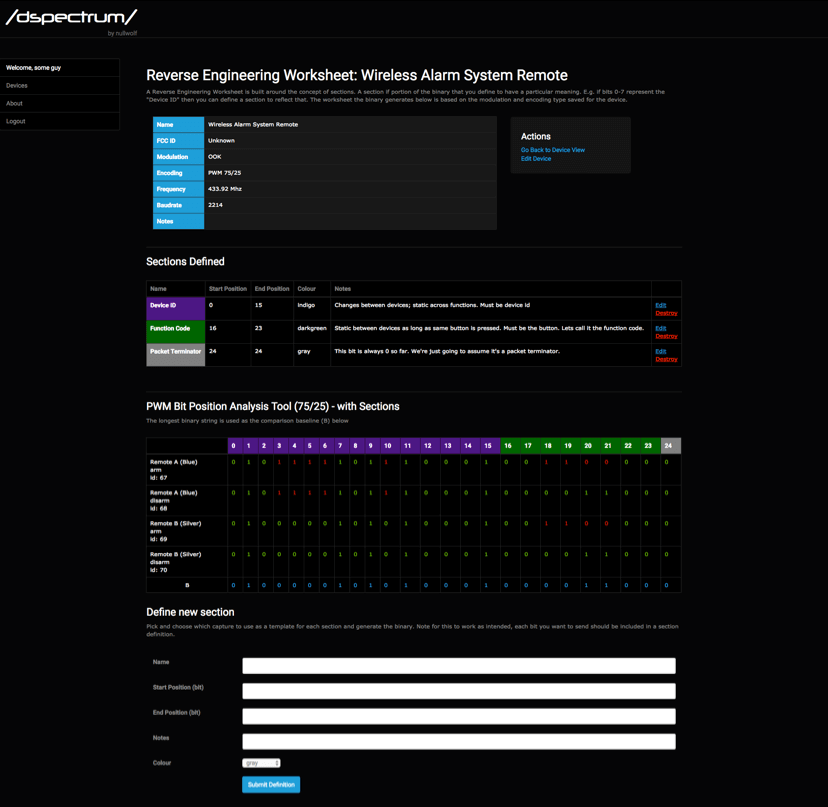
Over on YouTube a talk from the author of DSpectrum has been uploaded from his talk during the 13th Cyberspectrum Melbourne meetup. In his talk he goes through the full process of reverse engineering a wireless alarm system in DSpectrumGUI. DSpectrum is a reverse engineering tool that aims to make it trivial to demodulate digital RF transmissions using data captured from SDRs like an RTL-SDR or HackRF.
In the video he shows how to create a project, import a capture and create an overlay on Inspectrum and bring the waveform back into DSpectrum. DSpectrum was then able to automatically detect that the encoding used was PWM and convert it into a bit string. Then by importing multiple captures from various buttons on the alarm he shows how easy it is to see the differences in the bit strings from within DSpectrum. From these differences he uses DSpectrum to help identify what the function of each byte of the bitstring is. Finally he shows how to perform a replay attack with RFcat or similar hardware using the data gathered.
This is a really good talk to watch if you’re interested in getting started with reverse engineering simple digital signals, like those from ISM band devices.
WaveConverter is a tool that helps you extract digital data from RF transmissions that have been captured via Software Defined Radio (SDR). After the user defines the modulation parameters, framing and encoding, WaveConverter will process a stored I-Q file and extract the data from any transmissions that match this definition. Using programmable timing tolerances and glitch filters, WaveConverter is able to extract data from signals that would otherwise appear corrupted.
This software will make the process of reverse engineering signals easier and more error-proof. Because WaveConverter includes the ability to store and retrieve signal protocols (modulation + encoding parameters), we have been generating a database of protocols that we can quickly use to iteratively attack unknown signals.
This tool should be very useful for reverse engineering digital signals, such as those found in keyfobs, wireless doorbells, wireless temperature sensors and any other simple RF device. Simply use an SDR device like an RTL-SDR to capture a sample of the signal of interest and then open it up in WaveConverter to first easily analyze the signal and determine it’s properties, then to automatically demodulate any subsequent signal into a binary string. For more information the documentation can be found here (pdf).
WaveConverter seems to be quite similar in purpose to Inspectrum and DSpectrum which are two Linux tools that are also designed for reverse engineering digital signals.
Over on his blog Andy writes how he wanted a smart way to control his central heating system with a Raspberry Pi and Arduino microcontroller. He discovered that if he could reverse engineer his existing wireless thermostat then he would have an easy way to control the boiler in his house and with that a smart controller could be made. By reverse engineering the thermostat he also avoids the need to rig up his own control system.
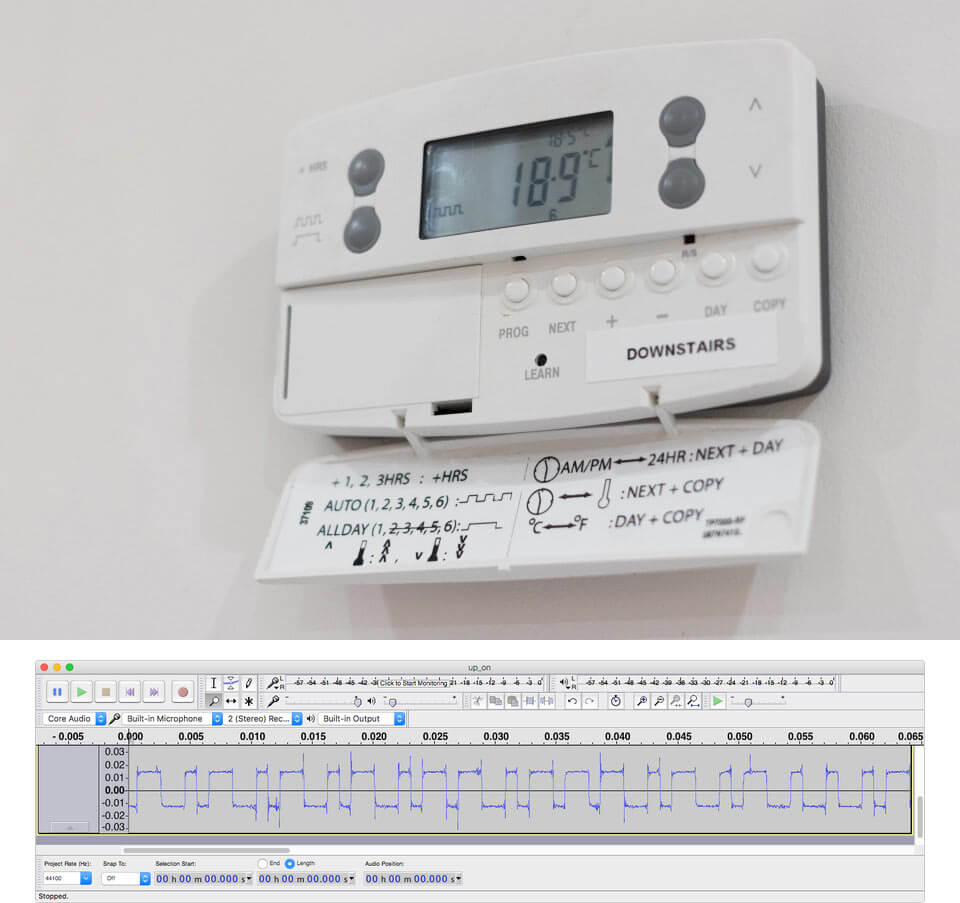
The existing thermostat wireless receiver is a Danfoss RX2. In order to reverse engineer the protocol Andy opened up an older that one he had and saw that it used an Infineon TDA5210 RF receiver chip. Armed with this part number he was able to look up the datasheet and determine the operating frequency. Then by using an RTL-SDR he captured some packets while pressing buttons on the thermostat transmitter and piped the audio file into audacity, where he was able to clearly see the digital waveform.
Andy then wrote a Python program using the ‘wave’ library, which allowed him to easily read binary values for a .wav file. With his code he was able to extract the data from the signal and determine the preamble, sync word, thermostat ID and the instruction code (on/off/learn).
In a future post Andy hopes to show us how he’ll use an RF69 module with an Arduino to actually control the thermostat using the reverse engineered packet knowledge.
Danfoss Wireless Thermostat and a Received Binary Waveform in Audacity
OpenHAB is an open source home automation software program which is designed to interface and manage all the various sensors and systems in an automated house. One problem however, is that many wireless sensors and actuators utilize a proprietary communications protocol that is not supported by OpenHAB.
In his home, Dan Englender had several Honeywell 5800 series 345 MHz wireless security door sensors, all of which interface using a proprietary protocol that is not yet implemented in OpenHAB. In order to get around this, Dan decided to reverse engineer the protocol and implement a decoder into OpenHAB himself.
Dan’s four part write up covers the RF capture & demodulation, protocol reverse engineering and implementation into OpenHAB. First he looked up the frequency and bandwidth of the signal via the FCC filing information on fcc.io. Then he captured some packets from a door sensor using his RTL-SDR and GNU Radio, and then wrote a short Python program to decode the protocol and transmit the door open/closed information to OpenHAB. In the future he hopes to optimize the decoder so that it can comfortably run on a Raspberry Pi as the GNU Radio script uses quite a bit of computing power.
The final project is called decode345 and the code is available over on his GitHub.
Honeywell 345 MHz Door SensorCustom Door Sensor Status in OpenHAB
[Also seen on Hackaday]
The Universal Radio Hacker is a software for investigating unknown wireless protocols. Features include
hardware interfaces for common Software Defined Radios
easy demodulation of signals
assigning participants to keep overview of your data
customizable decodings to crack even sophisticated
encodings like CC1101 data whitening
assign labels to reveal the logic of the protocol
fuzzing component to find security leaks
modulation support to inject the data back into the system
Inspectrum and Waveconverter are two similar programs for analyzing digital signals, however Universal Radio Hacker seems to be the most advanced.
Johannes has also uploaded four tutorial videos to YouTube which show the software in action. In the videos he uses Universal Radio Hacker to reverse engineer a wirelessly controlled power socket, and then in the last video he uses the software to transmit the reverse engineered signals via a HackRF.
After noting down the FCC ID printed on the device, they determined that the operating frequency was 315 MHz. They discovered from the documentation that each wireless DX device is encoded with a unique code that is precoded at the factory. Only remotes with the correct code programmed in can open the door.
The first attack they tried was a simple replay attack. They used a HackRF to record the signal, and then play it back again. This worked perfectly first time.
Next they decided to take this further and reverse engineer the protocol and see if a brute force attack could be applied. By doing some logic analysis on the circuit, they were able to figure out how to iterate over the entire key space. It turns out that the lock can be brute forced in at most 14.5 hours, or 7.25 hours on average.
Last year during a Russian wireless ‘capture the flag’ (CTF) competition one of the goals was to reverse engineer a remote controlled toy tank, and then to control it with a HackRF. One of the Russian CTF teams has posted a thorough write up on the reverse engineering process that was used on the toy tank (the link is in Russian, but Google Translate works okay).
The write up first shows the reception of the signal from the wireless controller, and then moves on to show how to receive it in GNU Radio and obtain a time domain graph of the digital signal. From the pulses it is simple to visually work out the binary string. Next an instruction decoder is created in GNU Radio which automatically obtains the binary string from the signal directly. Then once the codes for back, forward, left and right were obtained it was possible to write another GNU Radio program to transmit these codes to the RC toy tank from the HackRF.
DSpectrum is a reverse engineering tool that aims to make it trivial to demodulate digital RF transmissions. It is built on top of the Inspectrum tool which makes it easy to visualize and manually turn a captured digital RF waveform into a string of bits for later analysis by providing a draggable visual overlay that helps with determining various digital signal properties. DSpectrum added features to Inspectrum like automatically converting the waveform into a binary string with thresholding. RF .wav files for these tools can be captured by any capable radio, such as an RTL-SDR or HackRF.
Over on YouTube a talk from the author of DSpectrum has been uploaded from his talk during the 13th Cyberspectrum Melbourne meetup. In his talk he goes through the full process of reverse engineering a wireless alarm system in DSpectrumGUI. DSpectrum is a reverse engineering tool that aims to make it trivial to demodulate digital RF transmissions using data captured from SDRs like an RTL-SDR or HackRF.
In the video he shows how to create a project, import a capture and create an overlay on Inspectrum and bring the waveform back into DSpectrum. DSpectrum was then able to automatically detect that the encoding used was PWM and convert it into a bit string. Then by importing multiple captures from various buttons on the alarm he shows how easy it is to see the differences in the bit strings from within DSpectrum. From these differences he uses DSpectrum to help identify what the function of each byte of the bitstring is. Finally he shows how to perform a replay attack with RFcat or similar hardware using the data gathered.
This is a really good talk to watch if you’re interested in getting started with reverse engineering simple digital signals, like those from ISM band devices.
The PandwaRF (formerly known as GollumRF) is an RF analysis transceiver tool that can be very useful for investigating ISM band devices that communicate with digitally modulated RF signals. It can be used for applications such as performing replay attacks, brute force attacks, and other analysis. The RX/TX frequency range of the device is from 300 – 928 MHz, with a transmit power of up to +10 dBm.
The PandwaRF is based on the CC1111 chip which is the same chip used in devices like the Yard Stick One from Great Scott Gadgets (creators of the HackRF). Compared to the YS1 the PandwaRF is essentially the same, but designed to be much more portable, with a built in battery and an Android app that you connect to via Bluetooth. This makes it very useful for taking out in the field as no laptop is required to use it, just a phone or tablet. The PandwaRF can be used just like a YardstickOne when plugged into a PC however.
We should also clarify that CC1111 based devices like the PandwaRF and YS1 are not classed as SDRs. Rather they are RF transceiver chips that can demodulate, decode and transmit a fixed set of digital modulation schemes, such as OOK/ASK, 2-FSK, 4-FSK, GFSK, and MSK. While these devices are not able to receive or transmit any arbitrary signal like an SDR, they make reverse engineering, analysis, replay attacks, brute force attacks etc much simpler for common modulation schemes compared to using an SDR for the same purpose.
Early on in the year PandwaRF sent us a sample of their device for review. Unfortunately during that time their Android software was extremely buggy and we were simply unable to use the device properly. Others reported similar troubles on forums and blog comments. However fast forward to today and it now seems that the Android software is stable and functioning properly.
Replay Attack
PandwaRF Spectrum Analyzer Tool
We first tested the PandwaRF on a simple task which was a replay attack. The goal was to record the signal of a cheap wireless RF alarm, and see if we could replay it back. The wireless alarm is controlled with a keyfob.
First we used the Spectrum Analyzer tool in the PandwaRF app to try and get the frequency of the keyfob. The Spectrum Analyzer tool allows you to see about 1.2 MHz of bandwidth. We assumed the signal would be around 433 MHz. After pressing the button a few times the peak showed up at about 433.9 MHz on the spectrum analyzer. The refresh rate of the spectrum analyzer is quite low, so if the signal is not continuous it’s possible to miss the signal, which is we why we had to try several presses before the signal showed. A standard SDR like an RTL-SDR might be better for this initial frequency searching. We confirmed the frequency to be at 433.893 MHz on an RTL-SDR blog V3.
PandwaRF RX/TX Replay Attack Screen
Next we switched to the RX/TX tool. Here you can enter the frequency of interest and set the expected modulation. We know that this device is ASK/OOK modulated, so we chose this setting. You also need to set the data rate. If you don’t know this value then the app has a data rate measuring tool. So we just pressed on the Measure button, and then pressed a button on the remote until it converged to a data rate of 5,121.
Next you need to set the ‘desired payload’. This is how many bytes long the packet is and determines how long the capture is. As we were unsure we simply set it to 250 bytes to ensure that a longer capture was taken. The PandwaRF will keep on receiving until it receives the desired payload of 250 bytes or is stopped manually. Setting it longer allows us to capture a longer signal, and ensure that the replayed signal is received. For this alarm device it is okay if the same signal is played multiple times in a short time frame.
The final setting is the RX Frame length. This determines how many bytes will be captured before transferring the data to Android. So for example, if you set the desired payload to 100 Bytes, and the RX Frame length to 52 bytes, then in total you will capture 104 Bytes of data. The PandwaRF can only transfer in 14, 33, 52, 71 or 90 bytes, so select one that is closest to a multiple of your desired payload.
Finally we pressed on ‘Sniff’ and pressed the ‘bell’ button on the remote. The PandwaRF detected the signal and recorded the data. Now pressing Xmit replays the signal successfully causing the alarm bell to sound.
Replayed and Original Signal received with an RTL-SDR
Brute Force Attack
Brute force settings
The PandwaRF can also be used as a brute forcing tool. With cheap alarms the alarm code is relatively short, so can be brute forced in a matter of minutes. The PandwaRF already had a preset mode for our cheap Forecum door alarm, so we simply selected this mode and started the brute force. It gave an estimated brute force time of 28 minutes, which is the time it takes to run through every possible alarm code.
More advanced brute force settings
The PandwaRF app currently supports the Idk and PT2262 chipsets, as well as some models of DIO, Extel and Forecum house alarms. If the device that you want to brute force is not yet in their database, then you’ll probably need to do some analysis first on the PC with an SDR. Software like Universal Radio Hacker and DSpectrumGUI are good tools for this. Once you know the structure of the data, then you can program PandwaRF to perform the brute force attack.
Note that their newer ‘PandwaRF Rogue’ product is supposed to be significantly faster at brute forcing. For example the Android software gives us a estimated duration of 28 minutes with the standard PandwaRF, and only 3 minutes with the Rogue.
The Rogue is also able to brute force 32 bit codewords with zero delay in between transmissions. The standard PandwaRF has a minimum delay of 100 ms which can really slow things down. It also allows for function mask bit skipping, enable more brute force patterns and can split the brute force attempt into several steps. Also as we’ve seen from their videos the Rogue has more pre-set commercial devices built into its app.
So if brute forcing is your main use for the PandwaRF then it seems to make sense to get the Rogue. Unfortunately the Rogue is significantly more costly, coming in at 990 euros, vs 145 euros for the standard PandwaRF. Of course you could still use the standard PandwaRF on a PC with tools like rfcat to perform a faster brute force attack as well, just like you would with a YardstickOne.
PandwaRF Brute Force attack as seen by an RTL-SDR
Javascripting
Javascript in PandwaRF
If you need more powerful analysis or TX capabilities, then the PandwaRF can be controlled in Javascript code. For example, you might have already reverse engineered a device, and simply require the PandwaRF to transmit the correct code to replace a remote control. You could also create a jammer with this.
The code runs on the Android device and not on the PandwaRF, so each RF command generates a bluetooth transfer which can be quite slow. They write this is why they have created a specific brute force implementation in the app, so that they can run their native brute force code on the PandwaRF itself, which is must faster than transferring the RF command for every brute force step.
Conclusion
Overall the PandwaRF is a very handy tool for doing replay and brute force attacks while in the field. It can also be converted back into a PC based CC1111 device, like a Yardstick One simply by plugging it into a computer with a USB cable so you’re not missing out on that functionality either.
Compared to the Yardstick One the cost is a bit more, with the Yardstick One costing $99 USD at most outlets, and the PandwaRF costing 145 Euros (~$173 USD). So it is probably only really worth it if you are doing field testing.
That said, now that the PandwaRF software seems stable it is an excellent tool for investigating wireless devices in a simpler way compared to with an SDR. An SDR is still much more powerful, but tools like this simplify the process significantly. The best set of tools for reverse engineering would be a SDR combined with a device like this.
In the future it looks like they plan to implement new features such as De Bruijn (OpenSesame) attack’s and rolling code attacks and we look forward to testing those out.
Over on GitHub we've just seen the release of a program called rtlmm made by user ps2 which decodes MiniMed RF packets with an RTL-SDR. We weren't entirely such what MiniMed was, but from Googling the name it appears that it is a product by a company called Medtronic who sell medical equipment such as portable automatic insulin pumps and glucose monitors for diabetic patients. These products have RF telemetry links that transmit to a meter which can receives data and forwards it to your phone via Bluetooth LE. Sniffing the telemetry from these sensors could allow you to build up your own data without the need of the meter.
Rtlmm was inspired by a similar program called rtlomni which is a program released a few months ago and made by F5OEO. rtlomni works with Omnipod diabetes insulin pumps and monitors which are similar products to MiniMeds offerings.
Over on his blog "ele y ciencia" has written up two very useful blog posts - one on how to decode AFSK signals from scratch and the other on how to reverse engineer any unknown digital signal. The blog is written entirely in Spanish, but Google translate does a decent enough job at getting the message across (in Chrome right click anywhere on the page and select Translate to English or use the Google translate webpage).
The first post is about decoding an AFSK protocol and explains that you need to record the signal with an RTL-SDR or other SDR, apply a low pass filter to obtain the signal envelope and then apply thresholding with the known baud rate to obtain the demodulated digital signal. The tutorial is high level and just explains the process, but doesn't show how to do it in any software. Later on in the post he goes on to show how he reverse engineered a train-land radiotelephone system and a TCM3105 modem chip which utilizes a FSK system.
In the second post he shows how to decode any unknown digital signal using just an RTL-SDR and Audacity. He starts off with finding and recording an unknown digital signal with an RTL-SDR and then reverse engineers it in a sort of manual fashion without using any tools like Universal Radio Hacker. The post goes through the full details and steps that he took, and in the end he gets data out of the signal discovering that it is data from a Fleet Management System used in his country for monitoring data such as speed and engine data from commercial vehicles like trucks and buses.
The two posts are very detailed and could be an excellent reference for those interested in reverse engineering some unknown digital signals in your area.
Decoding an Unknown "Fleet Management" signal from scratch.
During the Hackaday superconference held during November 2017, Samy Kamkar presented a talk on how he reverse engineers devices, and in particular passive entry and start systems in vehicles. In the talk he also explains what tools he uses which includes SDRs like the HackRF One and RTL-SDR dongle and explains the methodology that he takes when looking at how to reverse engineer any new device. Samy is most famous for writing the Samy MySpace computer worm and also popularizing the "RollJam" wireless car door vulnerability. The talk blurb reads:
In this talk Samy Kamkar shares the exciting details on researching closed systems & creating attack tools to (demonstrate) wirelessly unlocking and starting cars with low-cost tools, home made PCBs, RFID/RF/SDR & more. He describes how to investigate an unknown system, especially when dealing with chips with no public datasheets and undisclosed protocols. Learn how vehicles communicate with keyfobs (LF & UHF), and ultimately how a device would work that can automatically detect the makes/models of keyfobs nearby. Once the keyfobs have been detected, an attacker could choose a vehicle and the device can wirelessly unlock & start the ignition. Like Tinder, but for cars.
Over on his blog "Foo-Manroot" has created a post where he shows us how he can control a wirelessly controlled powerplug with his HackRF. These power plugs can be used to turn electrically devices on or off remotely, and their wireless protocol is often simple On-Off Keying (OOK) with little to no security.
Foo-Manroot first explains how easily capture and replay a signal with the HackRF. If the signal is simple without any security like rolling codes then a simple replay attack like this will allow the HackRF to control the device quite easily. In the next section he goes on to explain how to actually analyze and synthesize the packets yourself using Python and GNU Radio. Finally he also shows that a brute force attack can be applied once you know how to synthesize the signal. Brute forcing runs over every possible packet combination in a short time and this can be pretty fast for simple protocols like those used in wireless remote controls. His post also includes all the GNU Radio files required so it is easy for someone to replicate his work easily.
If you are interested in controlling simple OOK devices like a wireless powerplug with replay attacks then we have a tutorial for doing this with a simple RTL-SDR and Raspberry Pi running RpiTX which might be useful for those who don't have a HackRF.
HackRF Controlling the Wireless Power Outlet by Brute Forcing Packets
Johannes Smit wanted to be able to view the live data from his SWR WH2303 weather station and send it to a database. Whilst the weather data acquisition software that he paid for worked well, he thought that there must be a cheaper and more fun way to grab the data. But unfortunately the manufacturers would not respond to his request for the RF protocol specifications. So Johannes decided to reverse engineer the protocol using his RTL-SDR instead.
Next he fired up Universal Radio Hacker (URH) and captured a sample of the weather station signal. Using URH he was able to determine the modulation type (FSK) and the bit length parameter (150us). Johannes' next step was to open the weather station, find the RF chip, look up the RF chip information on the web and find the spec sheet. From the spec sheet and internet forum searches he was able to determine the properties of the packet including the sync word and preamble. With this data he was able to determine the packet structure.
Finally he captured a packet and recorded the exact data shown on the weather station at the time of the packet. With this he was able to search the binary data string for the data shown on the weather station, indicating the location of a particular piece of data within the string.
Johannes' tutorial shows just how powerful tools like Universal Radio Hacker can be, and his tutorial is an excellent start for those looking at reverse engineering any of their own local RF protocols.